InterBase
Supported Windows Versions
| Windows Desktop OS | InterBase 2017 | InterBase XE7 | InterBase XE3 | InterBase XE | InterBase 2009 | InterBase 2007 | InterBase 7.1 |
|---|---|---|---|---|---|---|---|
| 10 | Yes | Yes(*1) | No | No | No | No | No |
| 8 | Yes | Yes | Yes | No | No | No | No |
| 7 | Yes | Yes | Yes | Yes | No | No | No |
| Vista | Yes | Yes | Yes | Yes | No | No | No |
| XP w/SP3 | No | Yes | Yes | Yes | Yes | Yes | Yes |
- When installing on 64-bit Windows 10 Build 1703 and higher, see the workaround.
| Windows Server OS | InterBase 2017 | InterBase XE7 | InterBase XE3 | InterBase XE | InterBase 2009 | InterBase 2007 | InterBase 7.1 |
|---|---|---|---|---|---|---|---|
| 2019 | Yes(*1) | No | No | No | No | No | No |
| 2016 | Yes | Yes | No | No | No | No | No |
| 2012 R2 | Yes | Yes | No | No | No | No | No |
| 2012 | Yes | Yes | Yes | No | No | No | No |
| 2008 R2 | Yes | Yes | Yes | Yes | No | No | No |
| 2008 | Yes | Yes | Yes | Yes | No | No | No |
| 2003 | No | No | No | No | Yes | Yes | Yes |
- InterBase 2017 is not officially supported on Windows Server 2019 though our internal testing has shown that it works properly.
InterBase XE7 Notes
Installation
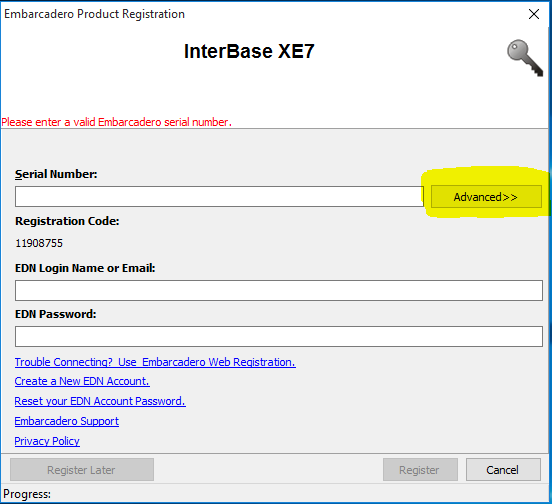
At the registration screen that appears at the end of the InterBase XE7 installation process, click the "Advanced" button:
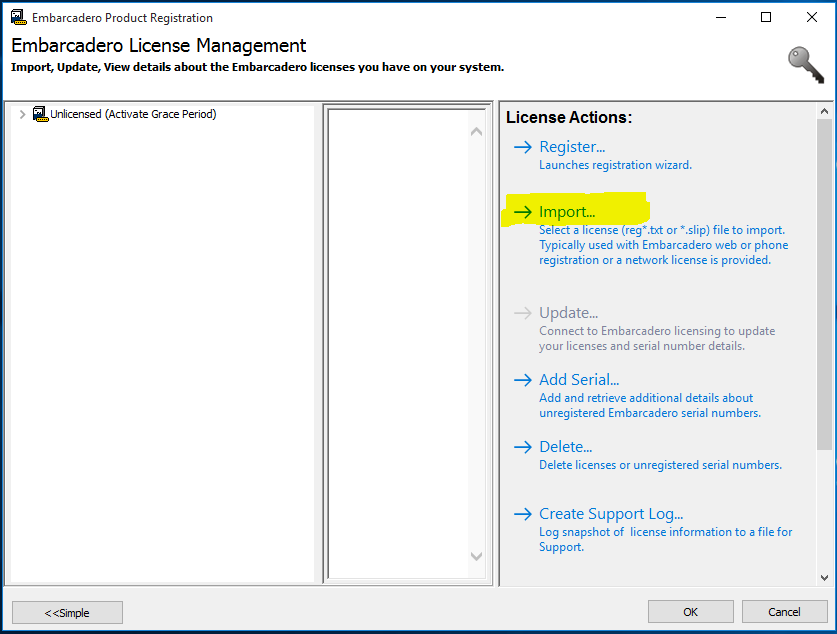
On the License Management screen, click the "Import" action:
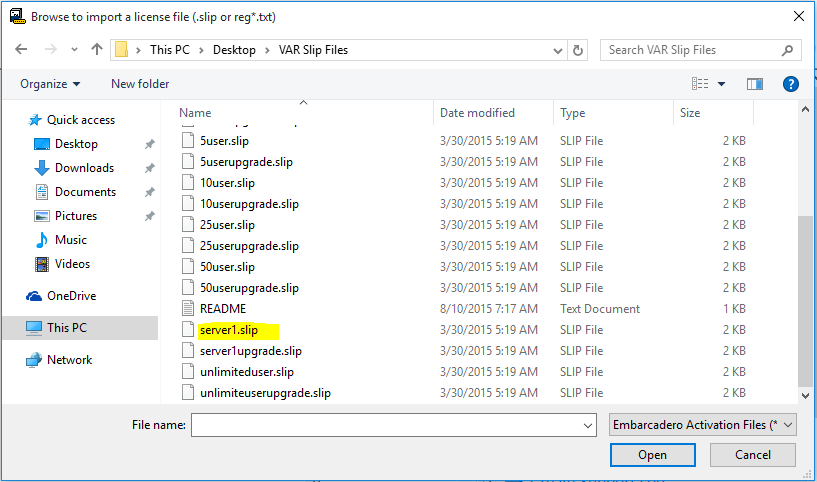
Select the "server1.slip" file and click the "Open" button:
After the SLIP file imports, click the "Import" action again, select the appropriate "xxuser.slip" file (where xx is the number of users) and click the "Open" button.
Finally, click the "OK" button on the License Management screen to proceed.
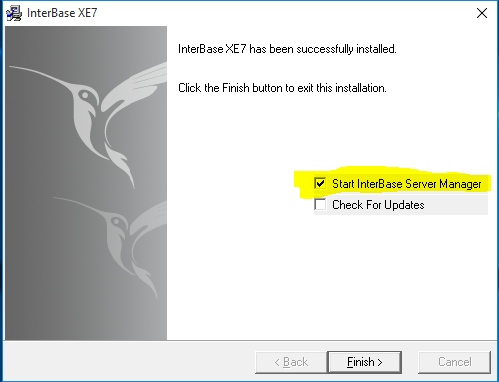
Check the "Start InterBase Server Manager" on the last screen of the installation:
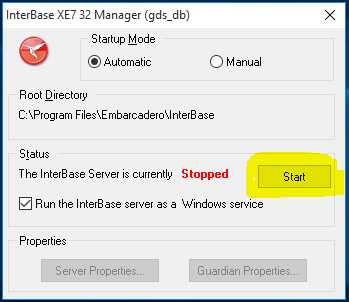
On the InterBase XE7 Manager screen, be sure the "Run the InterBase server as a Windows service" box is checked, then click the "Start" button:
Close the InterBase XE7 Manager screen.
Installation on 64-bit Windows 10 Creators Update (Build 1703) and higher
There is a known issue when installing InterBase XE7 on Windows 10 Build 1703 and higher. Even though Windows is 64-bit, the 64-bit option for InterBase is greyed out during the install process.
Determining the Windows 10 Build Number
To check the specific build number of Windows 10:
- Left-click the Windows icon on the desktop.
- Type the following and press ENTER: winver
- You will see a screen similar to the following:
Error creating thumbnail: /bin/bash: /usr/bin/convert: No such file or directory Error code: 127
Workaround for Windows 10 Build 1703 Issue
The workaround for the Windows 10 Build 1703 issue is to use the automated silent install option for InterBase. Here are the steps to do this:
- Create a temporary folder on the PC where you need to install InterBase.
- Copy the IB_INSTALL.EXE file into the temporary folder.
- Copy the *.slip files needed for this install into the temporary folder.
- Open Notepad and create the file "values.txt" in the temporary folder. Copy the following contents into Notepad:
COMPONENTS=AD
MAINDIR=C:\Program Files\Embarcadero\InterBase
INSTANCE=gds_db
TCP_PORT=3050
ARCH=64
- Open a command prompt.
- Change to the temporary folder created in the first step.
- Type this command: ib_install /s /m=values.txt
- Wait at least two minutes to give the installer time to finish installing.
- In the task manager, "end task" the ib_install process (it will not end on its own.)
- You can now use the InterBase License Manager to add any additional licenses and the InterBase Server Manager to start/stop InterBase.
Upgrading to InterBase XE7
InterBase XE7 is limited in its ability to directly open database files created in prior versions of InterBase.
BEFORE upgrading to InterBase XE7, make backups of all *.IB files that are to be converted.
"<InterBase Root Folder>\bin\gbak" -b -t -user CCWIN -password <password> 127.0.0.1:d:\ccgh\data\CCWSYS.ib d:\ccgh\data\CCWSYS.ibk
"<InterBase Root Folder>\bin\gbak" -b -t -user CCWIN -password <password> 127.0.0.1:d:\ccgh\data\CCW001.ib d:\ccgh\data\CCW001.ibk
...repeat for remaining companies
After upgrading to InterBase XE7, restore the backups of the *.IB files made previously.
"<InterBase Root Folder>\bin\gbak" -r -t -user CCWIN -password <password> d:\ccgh\data\CCWSYS.ibk 127.0.0.1:d:\ccgh\data\CCWSYS.ib
"<InterBase Root Folder>\bin\gbak" -r -t -user CCWIN -password <password> d:\ccgh\data\CCW001.ibk 127.0.0.1:d:\ccgh\data\CCW001.ib
...repeat for remaining companies
Using UPDATE/DELETE queries in IBConsole XE7
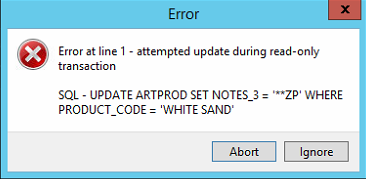
When issuing an UPDATE or DELETE query in the XE7 version of IBConsole, you may receive this error message:
The reason this occurs is that the default transaction mode has been changed to "Read" in XE7--in previous versions it was "Write".
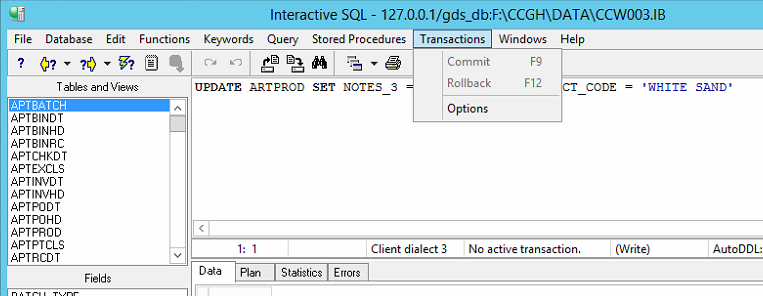
To change the transaction mode, select "Transactions->Options" from the query window menu:
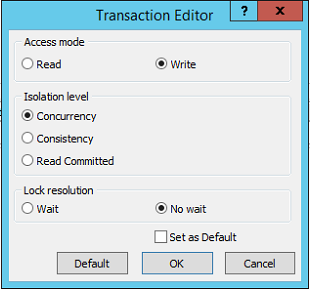
Select the "Write" option under Access Mode, and select the "Concurrency" option under Isolation Level:
I suggest that you do NOT check the "Set as Default" box to provide some level of protection against accidental data changes.
