QueryGen: Difference between revisions
m (1 revision imported) |
|||
| Line 379: | Line 379: | ||
*[[QueryGen Case: Generate Security Reports]] | *[[QueryGen Case: Generate Security Reports]] | ||
*[[QueryGen Case: Move Sales to Plant Tickets]] | *[[QueryGen Case: Move Sales to Plant Tickets]] | ||
*[[QueryGen Case: Add missing item to all Jobs]] | |||
Latest revision as of 15:24, 27 March 2024
QueryGen Overview
QueryGen is intended to create queries for the inserting and updating of databases. It is really a text generator that repeats for every record of a dataset replacing text from a template with data values. It can be used for much more than just creating queries - such as lists, .csv formatted text etc.
When Creating data for Keystone, make sure to review Keystone Data Manipulation Guidelines for creating and updating data by query.
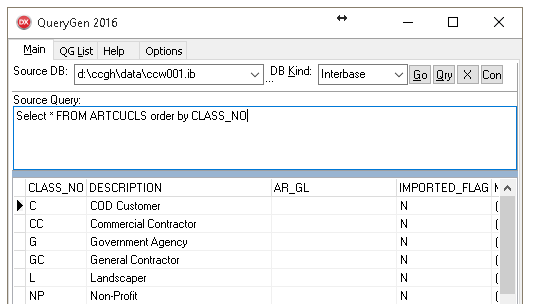
The QueryGen Screen
- DB Name Database Name/ Connection Information used for connection.
- DB Kind Selection of database type (Interbase, FireBird, ODBC, MSSQL, SQLite, Access, Excel)
- Go Connects and runs Query. If active connection, the connection is reset.
- Qry Run query without reconnecting. (This will include uncommitted data others can't see and exclude changes from other users since the connection was established).
- X Disonnects current connection. Useful for unlocking a data source to make changes.
- CON Connect Only
- Selection Query Query to select the source data.
The following 3 items create the model for the Result query:
- Header This query is the first item in the Result query. It only gets produced once.
- Update Query This is the primary model query that is repeated for each record. See expanded explanation of the query creation process.
- Closing Query This query is the Last item in the Result query. It only gets produced once.
- Repeat Every Used for a statement you only want ever x# of lines. Good to specify COMMIT statement every so often on a monster query.
- Results The resulting query that joins together the source data and the three model queries.
Connection Options
Interbase / Firebird
Querygen is first and foremost a good tool to pull data from Interbase:
DB Kind: Interbase or Firebird
- For Local File enter the path and file name of the database (e.g.: c:\program files\givenhansco\cc\cust\data\ccw001.ib)
- For Remote Files, enter the ipaddress (or computer name) followed by a colon, then the path and file name of the database (e.g. 192.168.0.1:c:\ccgh\data\ccw001.ib)
Query:
- Create a basic query selecting all necessary fields.
Microsoft Access
- DB Kind: Access
- Source DB: Filename of the file
Query:
- Select from the table within your access database. (Select * from customers)
Microsoft Excel
Starting with QG2016 this is a simplified way to get to excel files. It uses ODBC but allows you to just enter the file name and not setup an ODBC connection.
- DB Kind: Excel
- Source DB: Filename of the file
For OFFICE 365 A Special Driver is Required: Microsoft Office ODBC Driver This seems to work best with 64 bit querygen.
Query:
- Select from named range or sheet.
- Select * from [Sheet1$]
- Select * from MyTable
See Excel help on naming a range - this feature can be found on the Formula tab.
ODBC
Example ODBC
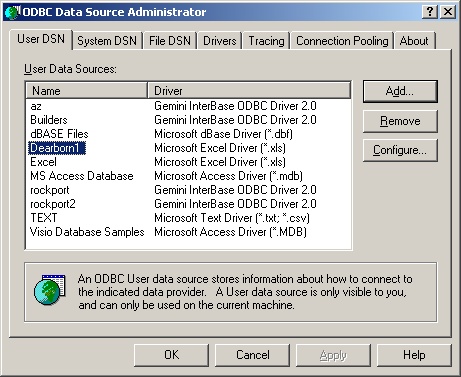
- Setup ODBC data Source (Administrtive Tools>Data Sources (ODBC). Each driver/connection type has variations
- Enter the ODBC name as the Source Path
- Select from the desired table
Excel with ODBC Alias
Excel Spreadsheet. (NOTE: QG2016 eliminates the need of setting up an ODBC connection for each spreadsheet. See "Excel" section above)
- Set up ODBC datasource using Excel driver. The spreadsheet dearborn.xls is named the the datasource dearborn1
- The data to be queried must be a Named Range in excel.
- Open the spreadsheet
- Highlight the range the data is in
- Select Insert>Name>Define from the menu and name the range (in this example called “test”)
- Multiple names can be Named within a spreadsheet.
- The Source Path is the ODBC name
- The Source Query references the Named Range in the spreadsheet
Sample query that selects Sheet 2
select * from [sheet2$]
Text File with ODBC
Note: While importing Text via ODBC can be convenient, it also can be very unpredictable. Automated handling of fields can result in unexpected changes to source data.
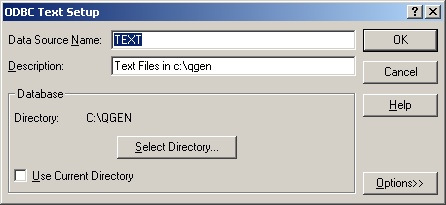
This has the advantage of selecting the flat text file from the Source Query line (no need to set up a separate ODBC data source for each file). The directory of the text files is specified in the ODBC Data source. The File deliniation is set in the ODBC data source. The default is csv as in this example. It can be changed to Tab Delimited. If changed to Fixed, you need to define all of the columns in the ODBC data source.
- Set up ODBC data source designating the directory or the text files are to be put.
- The Source Path is the ODBC name (e.g. TEXT)
- The Source Query references the text file in the designated directory.
LOCAL (Query other queries)
(starting Sept. 2016)
LOCAL allows you to query up to 4 separate query results which each can come from a different data source. These 4 queries are setup on the tabs LOC1 to LOC4. Each LOC tab has the same capability to connect to different data sources such as an Interbase, EXCEL or ODBC. Each local query is referred to as LQ1 through LQ4.
Examples of what you can do with "LOCAL":
- Compare values in 2 databases - to create inserts where data is missing from a target
- Compare values in 2 databases - to create updates where there are differences
- Combine data from a live database and an external Excel Sheet
- Compare data from 2 different systems (e.g. GPS & Dispatch)
Example: Query GPS and Dispatch databases to match up trucks
Set LOC1: Set DB Source to Fleet
Connection type to ODBC
Query:
Select * FROM fleet.dbo.Trucks
Set LOC2: Normal IB connection:
Query:
SELECT * FROM arttruck
Set Standard: Set DB kind to Local
Sample queries:
select * from LQ1
SELECT * FROM LQ2
See all fields from both tables where trucks exist in both databases (and truck active in dispatch)
Select LQ1.*,LQ2.* FROM LQ2
INNER JOIN LQ1 ON LQ1.TRUCK=LQ2.TRUCK_NO
WHERE LQ2.ACTIVE_FLAG='Y'
List all trucks in dispatch (LQ2) that are not in GPS (LQ1)
Select LQ2.* FROM LQ2
WHERE NOT EXISTS
 (SELECT * FROM LQ1 WHERE LQ1.TRUCK=LQ2.TRUCK_NO)
AND LQ2.ACTIVE_FLAG='Y'
Azure SQL
Azure SQL appears almost the same as standard MSSQL database. This example uses the Microsoft SQL Native driver. Login to Azure and to open the firewall for the client IP address and to derive the required connection values.
DriverID=MSSQL
Server=<Azure Server ID>   (this will start with "tcp:")
Database=<azure database name>
User_Name=<user name>
Password=<Password>
Encrypt=Yes
MetaDefSchema=dbo
MetaDefCatalog=<Catalog Name>  (likely the same as database name)
Formatting Options
- STRLEN - specifies the maximum number of characters to use from the import field. In the example below, it will select no more than two characters from the A1 field.
UPDATE ARTPROD SET PRODUCT_CLASS='{A1|STRLEN=2}' - TRIM - (QG2018Nov) Remove blanks before and after the field.
UPDATE ARTPROD SET PRODUCT_CLASS='{A1|TRIM=0}' - ADD - Adds a specified value to the field. In the example below, it sets TRANS_NO to a value imported from T_NO incremented by 1000.
UPDATE ARTINV SET TRANS_NO='{T_NO|ADD=1000}' - DATETIME - specifies that the data should be in Interbase's DATETIME format. This is a necessity for any time-stamp fields. In the example below, it will set CHANGED field into DATETIME format for the field in ARTCUST.
UPDATE ARTCUST SET LAST_CHANGE_DATE='{CHANGED|DATETIME=0}' - DECODEDATE - Decode some odd date formats.
- DEFAULT - sets a default value if none is available from the import. In the example below, it will take the credit terms from the TERMS field in the import, and if none is specified, set it to a default value of 30.
UPDATE ARTCUST SET CREDIT_TERMS='{TERMS|DEFAULT=30}' - FORMATINT - Format an integer using the Delphi Format command. See: Delphi Format Command (delphibasics.com)
Example - the format command %.5d means left fill the number with 0s. In the case below the text value 1 appears right before the number. If you had a trans_no of 243 it would be formatted as 00243. With the 1 appearing right before you would get 100243. This is useful if you want to add transactions to an existing session based on data already in that session. {SESSION_NO},1{TRANS_NO|FORMATINT=%.5d}
- FORMATFLT - Format a floating point number using the Format command. See: Delphi Format Command (delphibasics.com)
Essentially for any non-integer you can apply formatting.
- NULL - specifies to replace the value with NULL if the value of the imported field matches what is specified. In the eaxmple below, if the GL field contains a 0, it will instead set it to null in the COGS_GL field.
UPDATE ARTPROD SET COGS_GL='{GL|NULL=0}' - INC - (QG2014) An automatically Incrementing Value that starts at 1 and increase by 1. Useful for transaction numbers.
Insert Into ... '{A1|INC=0}'
Incrementors and Generators
Incrementors: QG has incrementors that create incremental values in the generated query. The INC function, the COUNTER function and INCA through INCZ can all be used in the model query. These will create integer values in the query. There is no dependency on the database being targeted.
Generators: Databases such as Interbase have Generators that create incremental values at the time the query is run. These should be used when the queries are creating data that needs to fall in line with existing sequence values in the database. (Think "Session No." and "Seq. No")
Incrementors
The QG INC syntax is as follows {FIELD_NAME|INC=1} The field name is required and must match an existing field from the input data but it does nothing. The "=1" indicates to increase the incementor value by 1. You can also use "INC=0" to repeat a value. To Reset the value of an incrementor to 1 use "INC=R"
The values "INCA" through "INCZ" work exactly the same.
In this simplified example these values in the Update (model) query:
{TRANS_NO|INC=1},{LINE_NO|INCA=R},
{TRANS_NO|INC=0},{LINE_NO|INCA=1},
{TRANS_NO|INC=0},{LINE_NO|INCA=1},
result an output like:
1,1,
1,2,
1,3,

2,1,
2,2,
2,3,

3,1,
3,2,
3,3,
Generators
Generators are database dependent. In Interbase the Generator syntax looks like GEN_ID(GEN_CCSESSION,1) where "GEN_CCSESION" references a specific generator in the system and the value 1 reference the value to increment the generator by.
When each record will use a new generated value - simply put the generator in the Update (Model) Query:
INSERT INTO  CCTCONT
( RECKEY, ENTITY_TYPE, ENTITY_ID, TITLE, NAME ... LAST_CHANGE_USER, ACTIVE_FLAG )  VALUES
( GEN_ID(GEN_CCCONTKEY,1), '{ENTITY_TYPE}', '{ENTITY_ID}', '{TITLE}', '{NAME}' ... 'HIT', '{ACTIVE_FLAG}'    );
Reusing the same Generator Value
When you need to use the same Generator Value for each transaction you don't want the generator creating a new value, so you can't use the above method.
In some cases you can get the last value of a generator by calling GEN_ID with the Generator increment set to 0, e.g. GEN_ID(GEN_CCSESSION,0). This is only safe when there is no possibility of the generator being updated from another source during the update process (e.g. you are working on a system stand-alone).
A safer option to store the value in a temporary table. In Keystone it's a best practice to use the table TMP_SNO. If this doesn't exist, create it with: CREATE TABLE TMP_SNO(SNO INTEGER);
If the table exists you need to clear it: DELETE FROM TMP_SNO;
In theory you could just store the session no: INSERT INTO X1 (XVAL) VALUES (GEN_ID(GEN_CCSESSION,1));. This method doesn't leave any info in the cctsessn table.
To create one session Number and record an entry in CCTSESSN enter the following for the "Header Query."
INSERT INTO TMP_SNO (SNO) SELECT session_no FROM CCP_SESSION_BEGIN('ADMIN', '<MY SCRIPT>', '127.0.0.1', '3.3.3.9');
(This procedure was created in Keystone 3.0)
Once you've created this value in TMP_SNO, you can use (SELECT SNO FROM TMP_SNO) for the value in the Update (model) query. See examples below...
Sample of Putting together Generators and Incrementors
In a situation where you are inserting Master and Detail records, and you are dealing with line numbers a mix of Incrementors and Generators can be used.
For example, creating a PRTNETPAYHST record and several PRTEMPDEFHST records. Assume the following spreadsheet is being used as source data. For each record in the sheet we will want to create one PRTNETPAYHST record and a separate PRTEMPDEFHST record for each of the data columns. There should be one session number for all of the records. There should be one transaction number for each input record that ties the single PRTNETPAYHST record to the multiple PRTEMPDEFHST records and there should be line numbers starting at one for the PRTEMPDEFHST records - these should restart each time there is a new input record.

For all of the records we want to create we want 1 session Number. Create the following for the "Header Query."
CREATE  TABLE TMP_SNO(SNO INTEGER);
INSERT INTO TMP_SNO (SNO)  SELECT session_no FROM CCP_SESSION_BEGIN('ADMIN', 'Insert Emp Balances', '127.0.0.1', '3.3.3');
The Header query will process just once no matter how many input records there are.
Here's a sample of the Update (Model) query for both PRTNETPAYHST and multiple PRTEMPDEFHST.
/* Employee {EMPLOYEE} */
INSERT INTO prtnetpayhst  (SESSION_NO, TRANS_NO, RUN_NO, EMP_ID, CHECK_SEQ, CHECK_DATE, CHECK_NO, WEEK_END_DATE, NET_PAY, PAYFREQ, DED_WEEK, DED_PERIODS, TAX_PERIODS, REC_TYPE, IMPORTED_FLAG, LAST_CHANGE_DATETIME, LAST_CHANGE_USER )  VALUES (
(SELECT SNO FROM TMP_SNO), {EMP_ID|INC=1}, NULL, '{EMP_ID}', 1, '{TRX_DATE}', NULL, NULL, '0', NULL, NULL, NULL, NULL, 'A', 'N', CAST('TODAY' AS TIMESTAMP), 'HIT' );
INSERT INTO  prtempdefhst  (SESSION_NO, TRANS_NO, LINE_NO, EMP_ID, DEF_ID, DB_GL_ACCOUNT, CR_GL_ACCOUNT, TRX_DATE, TRX_TYPE, DEF_VALUE, OVERRIDE_FLAG, RUN_NO) VALUES (
(SELECT SNO FROM TMP_SNO), {EMP_ID|INC=0}, {EMP_ID|INCA=R}, '{EMP_ID}', 'FEDGRS', NULL, NULL, '{TRX_DATE}', 'S', '{FEDGRS}', 'Y', NULL );
INSERT INTO  prtempdefhst  (SESSION_NO, TRANS_NO, LINE_NO, EMP_ID, DEF_ID, DB_GL_ACCOUNT, CR_GL_ACCOUNT, TRX_DATE, TRX_TYPE, DEF_VALUE, OVERRIDE_FLAG, RUN_NO) VALUES (
(SELECT SNO FROM TMP_SNO), {EMP_ID|INC=0}, {EMP_ID|INCA=1}, '{EMP_ID}', 'FEDTAX', NULL, NULL, '{TRX_DATE}', 'S', '{FEDTAX}', 'Y', NULL );
INSERT INTO  prtempdefhst  (SESSION_NO, TRANS_NO, LINE_NO, EMP_ID, DEF_ID, DB_GL_ACCOUNT, CR_GL_ACCOUNT, TRX_DATE, TRX_TYPE, DEF_VALUE, OVERRIDE_FLAG, RUN_NO) VALUES (
(SELECT SNO FROM TMP_SNO), {EMP_ID|INC=0}, {EMP_ID|INCA=1}, '{EMP_ID}', 'SSGROSS', NULL, NULL, '{TRX_DATE}', 'S', '{SS_GROSS}', 'Y', NULL );
INSERT INTO  prtempdefhst  (SESSION_NO, TRANS_NO, LINE_NO, EMP_ID, DEF_ID, DB_GL_ACCOUNT, CR_GL_ACCOUNT, TRX_DATE, TRX_TYPE, DEF_VALUE, OVERRIDE_FLAG, RUN_NO) VALUES (
(SELECT SNO FROM TMP_SNO), {EMP_ID|INC=0}, {EMP_ID|INCA=1}, '{EMP_ID}', 'SSTAX', NULL, NULL, '{TRX_DATE}', 'S', '{SS_TAX}', 'Y', NULL );
INSERT INTO  prtempdefhst  (SESSION_NO, TRANS_NO, LINE_NO, EMP_ID, DEF_ID, DB_GL_ACCOUNT, CR_GL_ACCOUNT, TRX_DATE, TRX_TYPE, DEF_VALUE, OVERRIDE_FLAG, RUN_NO) VALUES (
(SELECT SNO FROM TMP_SNO), {EMP_ID|INC=0}, {EMP_ID|INCA=1}, '{EMP_ID}', 'MCGROSS', NULL, NULL, '{TRX_DATE}', 'S', '{MC_GROSS}', 'Y', NULL );
INSERT INTO  prtempdefhst  (SESSION_NO, TRANS_NO, LINE_NO, EMP_ID, DEF_ID, DB_GL_ACCOUNT, CR_GL_ACCOUNT, TRX_DATE, TRX_TYPE, DEF_VALUE, OVERRIDE_FLAG, RUN_NO) VALUES (
(SELECT SNO FROM TMP_SNO), {EMP_ID|INC=0}, {EMP_ID|INCA=1}, '{EMP_ID}', 'MCTAX', NULL, NULL, '{TRX_DATE}', 'S', '{MC_TAX}', 'Y', NULL );
Closing query:
UPDATE CCTSESSN SET STATUS_FLAG='I', STOP_DATETIME=CAST('NOW' AS TIMESTAMP) WHERE SESSION_NO=(SELECT SNO FROM TMP_SNO);
COMMIT; DROP TABLE TMP_SNO;
- Using Select SNO from TMP_SNO sets every record to use the one session_no created by the Header Query.
- Alternatively we could have usedGEN_ID(GEN_CCSESSION,0) for the session number so long as nothing else will impact the generator value during processing.
- Using {EMP_ID|INC=1} creates a new transaction number for the PRTNETPAYHST transaction - this happens once per input record. Because each following transaction uses {EMP_ID|INC=0} the repeat the value.
- Using {EMP_ID|INCA=R} for the LINE_NO value for the first PRTEMPDEFHST line forces the value if the incrementor INCA to 1. Using {EMP_ID|INCA=1} sets it to 2 through 6 for the next 5 lines. The pattern of 1 through 6 recurs for each input record.
Conditional Inserts (Merging Data)
Sometimes you want to insert data only if it doesn't exist, such as when merging 2 sets of g/l accounts where some overlap exists. Since the Interbase INSERT statement has no where clause, we can accomplish this by creating our insert statement using special select statement.
In the example below, we use the artloc table (where location=0) because we can count on it returning the values just once, and add the additional conditions appropriate for the situation. If the condition is not bet then there will be no records returned from the select query therefor an insert will not be attempted.
Example of a condition insert into A/R Allowance class:
INSERT INTO ARTALCLS
( CLASS_NO, DESCRIPTION, ALLOW_GL, ALLOW_INCLUDES_TAX, IMPORTED_FLAG, LAST_CHANGE_DATETIME, LAST_CHANGE_USER, ACTIVE_FLAG)
SELECT  'B', 'Bad Debt', '6290.1.00', 'P', 'Y', CAST('TODAY' AS TIMESTAMP), 'HIT', 'Y'
 from artloc where loc_id=0 and not EXISTS (SELECT 'AAA' FROM ARTALCLS   WHERE CLASS_NO= 'B'  );
If a record with CLASS_NO = 'B' exists then no insert is attempted.
Using QG Query Builder to create a merge query
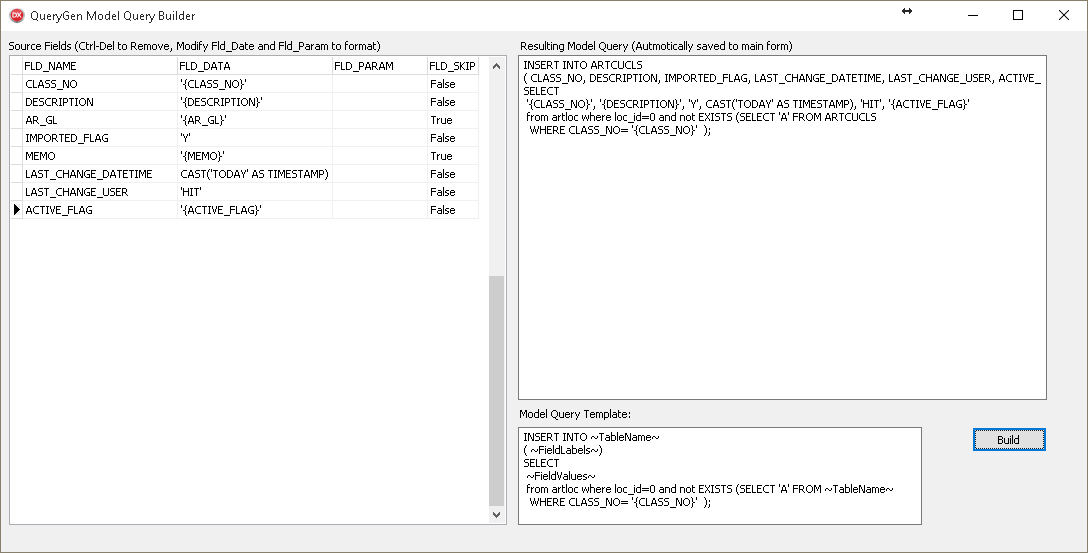
In QG 2016 the Query Builder can be used to simplify the process of creating Interbase Conditional Insert statements. In this example we will create a merge insert for Customer Classes.
First Create your simple select:

Set the Update (Model) Insert Template to:
INSERT INTO ~TableName~
( ~FieldLabels~)
SELECT
 ~FieldValues~
 from artloc where loc_id=0 and not EXISTS (SELECT 'A' FROM ~TableName~ WHERE ID= '{ID}'  );
Additionally you need to change the value "ID" to represent the actual key values of the target table.
Optionally you can override values on the field list. Here "IMPORTED_FLAG" is modified to 'Y' rather than pulling the value from the source table.
The Resulting insert script (abbreviated):
INSERT INTO ARTCUCLS
  ( CLASS_NO, DESCRIPTION, IMPORTED_FLAG, LAST_CHANGE_DATETIME, LAST_CHANGE_USER, ACTIVE_FLAG)
  SELECT  'C', 'COD Customer', 'Y', CAST('TODAY' AS TIMESTAMP), 'HIT', 'Y'
   from artloc where loc_id=0 and not EXISTS (SELECT 'A' FROM ARTCUCLS   WHERE CLASS_NO= 'C'  );
INSERT INTO ARTCUCLS
  ( CLASS_NO, DESCRIPTION, IMPORTED_FLAG, LAST_CHANGE_DATETIME, LAST_CHANGE_USER, ACTIVE_FLAG)
  SELECT  'CC', 'Commercial Contractor', 'Y', CAST('TODAY' AS TIMESTAMP), 'HIT', 'Y'
   from artloc where loc_id=0 and not EXISTS (SELECT 'A' FROM ARTCUCLS   WHERE CLASS_NO= 'CC'  );
More Samples
Merging CC Options:
INSERT INTO cctoptn
( USER_GROUP_ID, SECTION_NAME, OPTION_NAME, OPTION_VALUE, LAST_CHANGE_DATETIME, LAST_CHANGE_USER)
SELECT '{USER_GROUP_ID}', '{SECTION_NAME}', '{OPTION_NAME}', '{OPTION_VALUE}', CAST('TODAY' AS TIMESTAMP), 'HIT'
 from artloc where loc_id=0 and not EXISTS
  (SELECT 'A' FROM cctoptn WHERE USER_GROUP_ID= '{USER_GROUP_ID}' AND SECTION_NAME= '{SECTION_NAME}' AND OPTION_NAME= '{OPTION_NAME}'  );
In this example we test for three key fields when determining if the record exists.
Inserting GL Groups
INSERT INTO gltacgrp (
GROUP_ID, HEAD_DESCRIPTION, TOTAL_DESCRIPTION, LINE_DESCRIPTION, PARENT_GROUP_ID, SPECIAL_FUNCTION, DETAIL_LEVEL, SEQUENCE, ALLOC_RULE_ID, SECURITY_CLASS, DR_CR_FLAG, LAST_CHANGE_DATETIME, LAST_CHANGE_USER, ACTIVE_FLAG )
SELECT
'{GROUP_ID}', '{HEAD_DESCRIPTION}', '{TOTAL_DESCRIPTION}', '{LINE_DESCRIPTION}', '{PARENT_GROUP_ID}', '{SPECIAL_FUNCTION}', '{DETAIL_LEVEL}', '{SEQUENCE}', '{ALLOC_RULE_ID}', '{SECURITY_CLASS}', '{DR_CR_FLAG}', '{LAST_CHANGE_DATETIME|DATETIME=0}', '{LAST_CHANGE_USER}', '{ACTIVE_FLAG}'
 from artloc where loc_id=0 and not EXISTS (SELECT 'A' FROM GLTACGRP WHERE GROUP_ID= '{GROUP_ID}'  );
This will insert only the groups that do not exist.
QueryGen Cases
- QueryGen Case: Fix Standard Cost
- QueryGen Case: Create Inventory Transactions From Structure
- QueryGen Case: Replicate Tickets e.g. copying tickets from one database to another.
- Replicating Keystone Data with QueryGen
- QueryGen Case: Create Tax Records From Invoices
- QueryGen Case: Replicating Forms
- QueryGen Case: Import Keystone Batch Mixes
- QueryGen Case: Security Work
- QueryGen Case: Generate Security Reports
- QueryGen Case: Move Sales to Plant Tickets
- QueryGen Case: Add missing item to all Jobs


